Restoring backups
A file restore never writes over your live data. It puts the files into a separate folder, and you copy what you need back into place. That keeps a restore from overwriting something by accident, and it lets Arkive mount the data it protects read-only.
The one exception is a guided database restore, which loads a dump back into a running PostgreSQL, MariaDB, MySQL or MongoDB database after you confirm it by typing the database's name.
The commands on this page run in the Unraid terminal. They assume the container is called Arkive (the name the Unraid template gives it) and that you have your API key in a variable:
ARKIVE_API_KEY=$(cat /mnt/user/appdata/arkive/.api_key)
Before you start
- Where restores go. A restore destination must be inside
/config/restores,/tmp/arkive-restoreor/var/tmp/arkive-restore. Use/config/restores/<name>, which is/mnt/user/appdata/arkive/restores/<name>on the host. The two/tmplocations are inside the container: you can't see those files from the host, and they disappear when the container is re-created. - Files keep their full original path under the destination. Restoring a snapshot to
/config/restores/todayputs your app data in/mnt/user/appdata/arkive/restores/today/mnt/user/appdata/and the database dumps in.../today/config/dumps/. - Make room. A full restore needs about as much free space as the data in the snapshot.
- One at a time. Only one restore runs at a time, and a restore can't start while a backup is running ("Cannot restore while a backup is running"). Scheduled backups wait for a running restore to finish.
- Read-only destinations are refused. If the destination is on a read-only mount, Arkive says so before restoring anything.
- Clean up afterwards. Arkive leaves
/config/restoresout of its own backups, but the restored files take space until you delete them.
Restore a snapshot in the web interface
- Open Snapshots. Snapshots are listed newest first, with their short ID, host name, age, storage target ID, size and tags. The tags
job:<id>andrun:<id>tell you which job and run made each one. Use the target filter if you have several targets. - Browse shows the top level of a snapshot.
- Click Restore on the snapshot you want.
- Change Restore To from the pre-filled
/tmp/arkive-restoreto a folder under/config/restores, for example/config/restores/today. - Dry run is ticked by default. Preview Restore then lists what the snapshot contains and writes nothing, which checks that the snapshot can be read.
- Untick Dry run and click Restore Now. The dialog restores everything in the snapshot.
The snapshot list is a cache. Arkive refreshes it after every backup run for the targets the run uploaded to. To reload it from the repositories now, for example on a fresh install:
curl -X POST -H "X-API-Key: $ARKIVE_API_KEY" http://localhost:8200/api/snapshots/refresh
Restore only some paths
The web interface restores whole snapshots. To restore part of one, list paths through the API. paths takes paths as they appear in the snapshot, and an empty list means everything. Without restore_to, the files go to a new folder /config/restores/restore-<id>.
curl -X POST -H "X-API-Key: $ARKIVE_API_KEY" -H "Content-Type: application/json" \
  -d '{"snapshot_id": "<snapshot-id>", "target": "<target-id>",
       "paths": ["/config/dumps"], "restore_to": "/config/restores/dumps"}' \
  http://localhost:8200/api/restore
The CLI inside the container does the same:
docker exec Arkive python -m app.cli --api-key "$ARKIVE_API_KEY" restore list
docker exec Arkive python -m app.cli --api-key "$ARKIVE_API_KEY" restore run <snapshot-id> \
  --target <target-id> --paths /mnt/user/appdata/vaultwarden --restore-to /config/restores/vaultwarden
restore list and the Snapshots page show each snapshot's ID and target ID.
Copy files back into place
Arkive's mounts of your data are read-only, so you copy restored files back from the Unraid terminal:
- Stop the app's container.
-
Copy its folder back, for example:
rsync -a /mnt/user/appdata/arkive/restores/today/mnt/user/appdata/vaultwarden/ /mnt/user/appdata/vaultwarden/Add
--deleteif files created after the snapshot should be removed. 3. Start the container. 4. Delete the restore folder when you are done.
restic restores file owners and permissions when it runs as root, which it does with the template's --user 0:0.
Restoring an app's folder brings back its database files as they were on disk during the backup, possibly in the middle of a write. For an app with a database, also restore the database from its dump (next section).
Restore one database (guided)
Restore a database, on the Restore page, puts a single database back the way it was in a snapshot, without the manual steps in the next section. You can also start it from a database's row on the Databases page.
- Choose a database. Each one shows how it will be restored:
- PostgreSQL, MariaDB, MySQL and MongoDB are restored in place: Arkive loads the dump into the running database container.
- SQLite and Redis are prepared for you: Arkive restores the file and checks it, keeps a safety copy of the current data, and gives you the exact commands to swap it in. Arkive does not write to your app data itself.
- Any other database type is not supported here. Restore its dump by hand, as described below.
- Choose a restore point and click Check snapshot. Arkive finds that database's dump in the snapshot and checks the container. Nothing is changed yet.
- Review and confirm. You see what will happen and which apps use the database. Arkive can stop those apps for the restore and start them again afterwards. For an in-place restore you type the database's name to confirm.
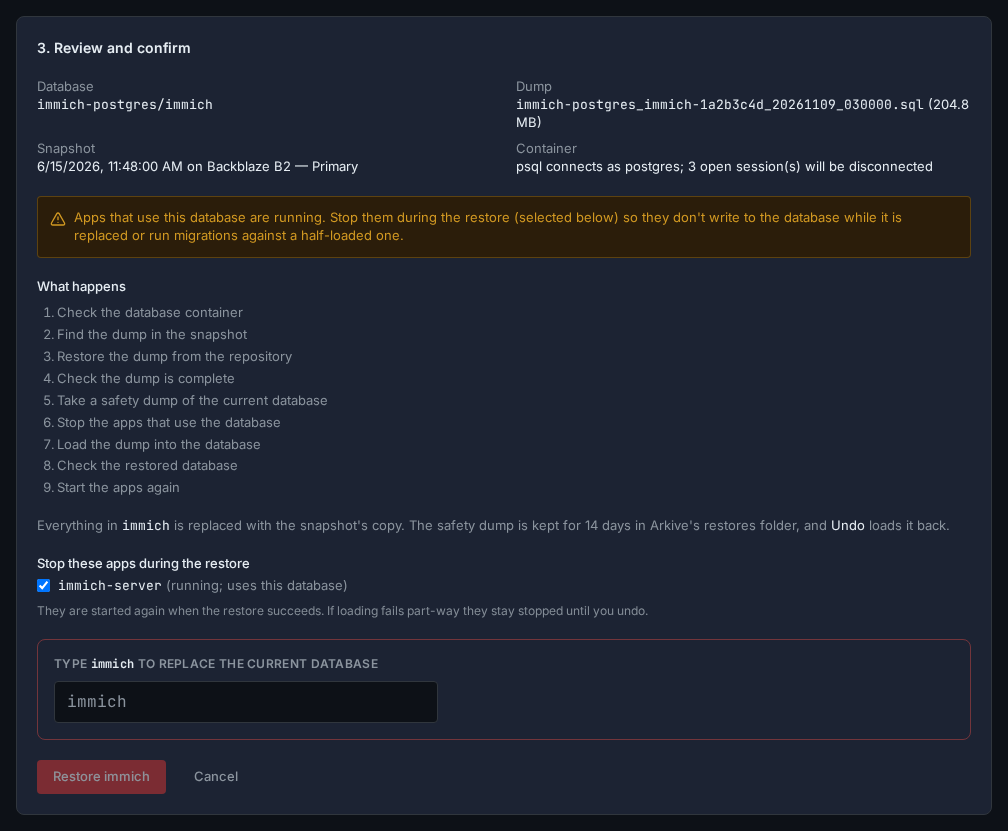
Before it changes anything, Arkive takes a safety dump of the database as it is now. If the result is not what you wanted, Undo this restore loads that safety dump back the same way. The restored dump and the safety dump are kept in /config/restores/guided-<id>/; delete the folder when you no longer need them.
No backup, restore drill or other restore runs while a guided restore is in progress. Scheduled backups wait for it.
MongoDB
- What is replaced. A server with
MONGO_INITDB_DATABASEset is listed under that database, and only that database is replaced. A server without it is listed asadmin, because Arkive dumps the whole server: restoring it replaces every database exceptadmin,configandlocal, including databases created after the backup. Users and roles (they live inadmin) are left as they are. - Checked first. Arkive reads the whole archive before it changes anything: every collection must have its end marker and a matching checksum, so a dump that was cut short or damaged is refused. (
mongorestore --dryRundoes not read the documents, so it can't tell.) - The load. The databases being replaced are dropped, then
mongorestore --archive --dropreads the archive from stdin. Afterwards Arkive compares the number of documents in each collection with the dump. - Logins. Arkive logs in with
MONGO_INITDB_ROOT_USERNAMEandMONGO_INITDB_ROOT_PASSWORDfrom the container, like the backup does. The password is not put on a command line:mongoshandmongodumpread it from their input, andmongorestore(whose input is the archive) from a file in a new private folder in the container's own/tmp, removed afterwards. Only when the container's/tmpis a mounted folder, or that folder can't be made, does it go on themongorestorecommand line; the restore's steps say so. - Supported setups. A standalone server or the primary of a replica set, on an image that has
mongosh(MongoDB 6.0 and later images). A secondary and amongosrouter are refused before anything changes.
Redis
Redis reads its data file when it starts and writes it again when it stops, so the file can only be replaced while Redis is stopped. Arkive restores the .rdb file from the snapshot into /config/restores/guided-<id>/restored/, checks its header and checksum and that the running Redis can read its format, and takes a safety copy of the current data with BGSAVE (like a backup does). The steps it then shows use the data folder and file name Redis reports (CONFIG GET dir and dbfilename), on the server's side of the container's volume:
- Stop the container.
- Keep a copy of the current data file (and, with the append-only file on, move the append-only folder or file aside). The copies end in
.before-restore-<date>-<time>. - Copy the restored file over the data file.
- With the append-only file on (
appendonly yes), Redis loads that instead of the data file, and would start with the old data or none at all. So the steps make a new append-only file from the restored data: on Redis 7 and later a newappendonlydirwith the restored file as its base and a manifest that lists it, on older versions anappendonly.aofthat starts with the restored data. - Give the files back to the user Redis runs as, start the container, and check the keys with
redis-cli INFO keyspace.
To go back, run the same steps with the safety copy (its path is the last line) in place of the restored file. A Redis that keeps its data inside the container instead of on a volume is refused, as is a dump in a newer format than the running Redis reads.
Restore a database from its dump
Dumps are in the config/dumps/ folder of a restore. Each file is named <container>_<database>-<hash>_<YYYYMMDD_HHMMSS>.<ext>. arkive-dumps-manifest.json in the same folder lists every dump with its container, image, database type, database name and, for SQLite, the path where the database file was found. Arkive keeps only the newest dump of each database in the dump folder, so a snapshot normally holds one dump per database. Older dumps are in older snapshots.
Stop the apps that use a database before you restore it.
PostgreSQL (.sql, or .sql.gz with gzip compression)
Arkive dumps each database with pg_dump --clean --create --if-exists. Loading the file drops the database if it exists, creates it again and fills it. The dump keeps object owners and grants (since 0.5.0), so the roles they name must exist first: on a new server, load the roles dump described below before any database dump. PostgreSQL can't drop the database you are connected to, so connect to a different one:
-
for most dumps, the
postgresmaintenance database:docker exec -i <postgres-container> psql -U <user> -d postgres -v ON_ERROR_STOP=1 < <dump>.sql gunzip -c <dump>.sql.gz | docker exec -i <postgres-container> psql -U <user> -d postgres -v ON_ERROR_STOP=1 -
for a dump of the
postgresdatabase itself (file name<container>_postgres-<hash>_<timestamp>.sql, orpostgresas the database name in the manifest),template1. Arkive dumpspostgreswhen it is the database the container is configured with (noPOSTGRES_DB,DB_DATABASE_NAMEorDB_NAMEset) or when it holds tables of its own. Connected topostgres, this load stops with "cannot drop the currently open database" and restores nothing.docker exec -i <postgres-container> psql -U <user> -d template1 -v ON_ERROR_STOP=1 < <dump>.sql gunzip -c <dump>.sql.gz | docker exec -i <postgres-container> psql -U <user> -d template1 -v ON_ERROR_STOP=1
<user> is the database superuser of that container, usually its POSTGRES_USER. A restore drill loads dumps the same way, connected to template1 for the postgres database and to postgres for every other one, after the roles dump. The restored database and its objects belong to the roles that owned them before, and their grants come back too. Dumps made by Arkive 0.4 and earlier have no owner or privilege statements; their objects belong to the user you load them with.
On a new database server, load the roles first, before any of that server's database dumps. Arkive dumps them per PostgreSQL container with pg_dumpall --globals-only into <container>_globals-<hash>_<timestamp>.sql. Load that file connected to postgres, without ON_ERROR_STOP (the role you connect as already exists, and creating it again reports an error you can ignore). If the dump user couldn't read role passwords (it wasn't a superuser), Arkive made the roles dump with --no-role-passwords, and you need to set the passwords again.
MariaDB and MySQL (.sql, or .sql.gz with gzip compression)
Arkive dumps each database with mysqldump --single-transaction --databases <name> (mariadb-dump on MariaDB images). The file creates the database and switches to it, so load it without naming a database:
docker exec -i <mariadb-container> mysql -u root -p'<root-password>' < <dump>.sql
gunzip -c <dump>.sql.gz | docker exec -i <mariadb-container> mysql -u root -p'<root-password>'
On images without a mysql command, use mariadb.
The database dumps do not contain user accounts: those live in the server's mysql system schema. Arkive dumps them separately, once per MariaDB/MySQL container, into <container>_accounts-<hash>_<timestamp>.sql (accounts as the database name and kind in the manifest). The file recreates every application user and role with its password hash, authentication plugin, lock state and resource limits, then gives back its grants and default roles. On a new server, load it after all of that server's databases: grants on single tables or columns need those tables to exist.
docker exec -i <mariadb-container> mysql -u root -p'<root-password>' < <container>_accounts-<hash>_<timestamp>.sql
What to know about this file:
- Users that already exist on the new server, such as the
MYSQL_USERthe image creates from its environment, get the dumped password, so the app keeps working with the password it had. Grants are only added; nothing on the new server is revoked. rootis not in the file, so the new container keeps the root password from its own environment, which the image, its healthcheck and Arkive itself use. Neither are the server's own accounts (mysql.sys,mysql.session,mysql.infoschema,mariadb.sys), the MariaDB image'shealthcheckaccounts,debian-sys-maintor anonymous accounts. The header of the file lists every account it left out.- Arkive can only dump accounts when it connects as root, so the container needs
MYSQL_ROOT_PASSWORDorMARIADB_ROOT_PASSWORD(or an empty root password). With only the application user's credentials (for example withMARIADB_RANDOM_ROOT_PASSWORD), the backup records the accounts dump as skipped with that reason. The run stayssuccess, and its list of dumps shows the accounts dump as skipped with that reason. What you get on a new server in that case: the image createsMYSQL_USERagain from the same environment (with the password in that environment), and every other account, and any password changed since the container was created, must be recreated by hand. The restore plan's users-and-grants step then prints that there is no accounts dump in the restore and loads nothing. - If you restore only some of the server's databases, a grant on a table you did not restore stops the load at that line. Add
--forceto the client to load the rest and see each error. - Restore drills don't load this file: a drill loads one database at a time into an empty server, where grants on the server's other tables would fail. The file is checked for its completion line when it is written, like the database dumps.
MongoDB (.archive, or .archive.gz)
Arkive uses mongodump --archive and dumps the whole server. With gzip compression the whole archive is compressed, so decompress it with gunzip -c (mongorestore --gzip is for a different format). --drop replaces the collections that are in the dump; collections created since are kept. Add --nsInclude='<database>.*' to restore one database, --nsExclude='admin.*' to leave users and roles as they are, and --username <user> --authenticationDatabase admin --password '<password>' if the server needs a login:
docker exec -i <mongo-container> mongorestore --archive --drop < <dump>.archive
gunzip -c <dump>.archive.gz | docker exec -i <mongo-container> mongorestore --archive --drop
SQLite (.sqlite3)
The dump is a complete copy of the database made with SQLite's online backup, checked with PRAGMA integrity_check. To restore it, stop the app, copy the file over the app's database file (the manifest's host_path says where that is) under the original name, delete any -wal and -shm files next to it, and start the app.
Redis (.rdb)
The dump is Redis's own RDB file, written by BGSAVE. Stop the Redis container, copy the file over the data file in its data folder (dump.rdb unless dbfilename says otherwise), and start it. If the server uses the append-only file, moving it aside is not enough: Redis then starts empty. Make a new append-only file from the dump as described in the guided restore for Redis, which also gives you the exact commands. The restore plan's Redis steps do the same without asking you for paths: they read the data folder, file name and append-only settings from Redis while it still runs (or use the redis image's defaults, /data and dump.rdb, and look at the container's command line and the files in the folder), and need the data folder to be a volume or bind mount.
Restore the Unraid flash configuration
Flash backups are flash_<timestamp>.tar files in the dump folder: a tar archive of the contents of /boot/config, uncompressed. Extract it to a working folder and copy what you need, such as super.dat, shares/, plugins/ or the Docker templates in plugins/dockerMan/templates-user/, onto the flash drive's config folder:
mkdir /tmp/flash && tar -xf flash_<timestamp>.tar -C /tmp/flash
Arkive keeps the 7 newest flash archives in the dump folder.
Disaster recovery on a fresh server
When the server is gone, you need:
- the encryption password, from your recovery kit,
- the repository location of at least one target, also in the kit, and
- the credentials for that storage (B2 key, S3 keys, SFTP password and so on), from your provider account or password manager.
With a fresh Arkive install
- Install Unraid and Arkive. Set up the array and shares, then install Arkive as in the quick start, with the same path mappings. For a local target, bring the repository folder back first: mount the disk, or copy the folder to the same path.
- Run the setup wizard with the same encryption password and the same storage settings: the same bucket for B2, S3 and Wasabi, the same remote path for SFTP, the same path for a local target. Arkive finds the existing repository and uses it as it is.
- Pause every job straight away, under Settings → Schedule or Settings → Backup Jobs. A backup of the half-restored server would become the newest snapshot, and the retention that runs after each backup could then forget older snapshots from the same day or week.
- Load the snapshot list:
curl -X POST -H "X-API-Key: $ARKIVE_API_KEY" http://localhost:8200/api/snapshots/refresh. The API key is on the wizard's last page and in/mnt/user/appdata/arkive/.api_key. - Restore the newest good snapshot into
/config/restores/drfrom the Snapshots page, as described above. If the newest one was taken after things started going wrong, pick an older one. - Restore the flash configuration if you are rebuilding the flash drive, from
config/dumps/flash_<timestamp>.tarin the restore. -
Copy app data back, with the app containers stopped. Leave Arkive's own folder out, because Arkive is using it (the leading
/limits the exclusion to the top-levelarkivefolder):rsync -a --exclude '/arkive/' /mnt/user/appdata/arkive/restores/dr/mnt/user/appdata/ /mnt/user/appdata/ -
Recreate your containers. Their Unraid templates are in the flash archive under
plugins/dockerMan/templates-user/. - Restore the databases from their dumps, as described above, before you start the apps that use them. Recreate each database container with the same environment as before. For PostgreSQL, load the roles dump first; for MariaDB and MySQL, load the accounts dump after the server's databases. The restore plan PDF (Restore → Restore Plan) lists these steps in order with the commands for each container.
- Resume the jobs, run a backup, and run a restore drill.
- Generate a new recovery kit. The targets were created again, so their IDs and repository strings changed.
Bring back Arkive's own settings
Every snapshot contains config/dumps/arkive_self.db, a copy of Arkive's database (jobs, targets, notification channels, settings and history). The secrets in it are encrypted with the old instance's keyfile, which is in your recovery kit. To bring it back once your apps are running again:
- Stop the Arkive container.
- In
/mnt/user/appdata/arkive/, replacearkive.dbwith the restoredarkive_self.db(restores/dr/config/dumps/arkive_self.dbfor the restore above), and deletearkive.db-walandarkive.db-shmif they exist. - Write the keyfile from the recovery kit to
/mnt/user/appdata/arkive/.keyfile, with mode 600. -
Put the old instance's API key file back. The restored database accepts only the old instance's API key, while
/mnt/user/appdata/arkive/.api_keystill holds the new install's key, which the CLI and the commands on this page read. If/mnt/user/appdatawas a watched directory, the old file is in the restore:cp /mnt/user/appdata/arkive/restores/dr/mnt/user/appdata/arkive/.api_key /mnt/user/appdata/arkive/.api_key chmod 600 /mnt/user/appdata/arkive/.api_key -
Start Arkive. If the keyfile doesn't match the database, Arkive refuses to start and says so (see Troubleshooting).
- Sign in with the old API key, the one now in
.api_key.
If the restore has no .api_key, Arkive can read the old key back from the restored database, which keeps a copy encrypted with the keyfile. With Arkive running, this prints it:
docker exec Arkive python -c "import sqlite3; from app.core.security import decrypt_value; row = sqlite3.connect('/config/arkive.db').execute('SELECT value FROM settings WHERE key = ?', ('api_key',)).fetchone(); print(decrypt_value(row[0]))"
Sign in with it, save it in your password manager, and write it to /mnt/user/appdata/arkive/.api_key (mode 600) so the commands on this page work again. Signing in with the new install's key fails, and 5 wrong keys within 5 minutes lock your IP address out for 60 seconds.
The jobs resume on their schedules as soon as Arkive starts.
With restic alone
You don't need Arkive to read the backups. Install restic on any machine.
Local repository. Copy the repository folder (the kit's host path) to the machine, or mount the disk, then:
export RESTIC_PASSWORD='<encryption password>'
restic -r /path/to/arkive-repo snapshots
restic -r /path/to/arkive-repo restore latest --target /restore
Cloud or SFTP repository. Arkive reaches these through rclone, and the repository string has the form rclone:<remote>:<path>. Install rclone, run rclone config, and create a remote whose name is the <remote> part of the string, with the same storage type and your credentials. Then use the repository string as it is:
restic -r rclone:<remote>:<bucket>/arkive-backups snapshots
restic -r rclone:<remote>:<bucket>/arkive-backups restore latest --target /restore
To restore part of a snapshot, add --include, for example --include /config/dumps for just the database dumps. If more than one server has used the repository, add --host <name> to pick the latest snapshot of the right one.