Setup wizard
A fresh install opens the setup wizard at http://<your-server>:8200. It has six steps. None of your choices are saved until you click Complete Setup on step 5, and you can go back and forth until then.
Setup can be completed only once. Until then, every protected API route except the wizard's container and directory scans returns 401, but anyone who can reach the port could complete setup and take over the instance, so finish it right after installing. Each IP address can attempt setup 5 times per 15 minutes.
Step 1: Encryption password
Every snapshot is encrypted with this password (restic's repository encryption). The wizard asks for it twice and requires at least 12 characters.
- It cannot be changed after setup.
- It is the only way to open your backups. Arkive stores it encrypted in its database, but that copy is lost with the server. Save it in a password manager now, and save the recovery kit after setup.
- Reinstalling? Enter the same password you used before. With the same storage target settings in step 3, Arkive reuses the existing repository instead of creating a new one. Disaster recovery on a fresh server walks through the whole procedure.
Step 2: Container discovery
Scan for Containers lists your containers through the read-only Docker socket and shows how many databases Arkive found in each. The step is informational, and you can skip it: discovery also runs at first start, daily at 03:00, and at the start of every run that dumps databases. Every database it finds is dumped automatically. You can exclude individual databases later on the Databases page.
If Docker can't be reached, the step says so and you can continue.
Step 3: Backup destination
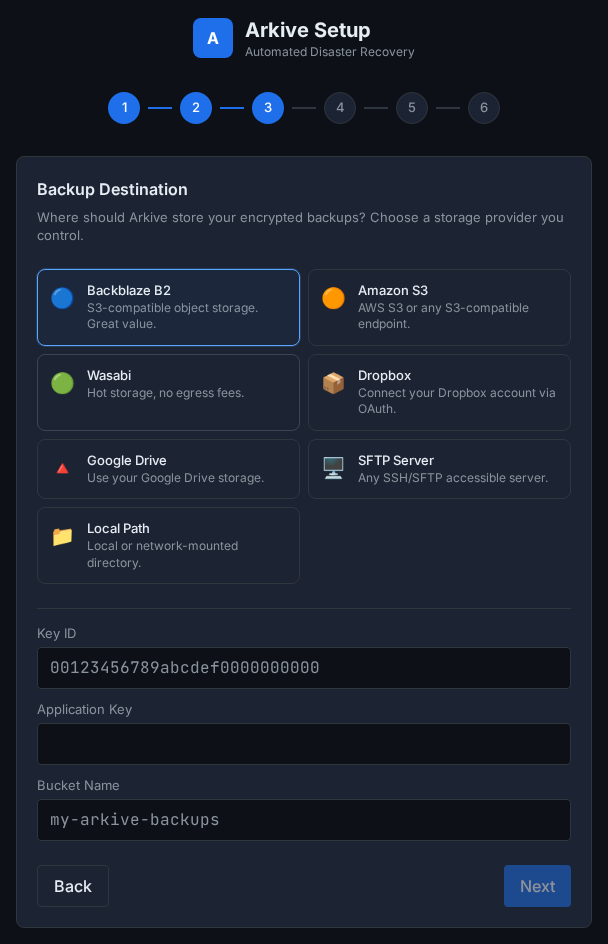
Pick a storage provider and fill in its fields. Next stays disabled until the required fields are filled in. Storage providers describes the fields for each one.
| Provider | Fields in the wizard |
|---|---|
| Backblaze B2 | Key ID, Application Key, Bucket Name |
| Amazon S3 (or any S3-compatible service) | Endpoint URL, Access Key, Secret Key, Bucket, Region |
| Wasabi | Access Key, Secret Key, Bucket, Region |
| Dropbox | OAuth Token |
| Google Drive | Client ID, Client Secret, OAuth Token |
| SFTP Server | Host, Port, Username, Password, Remote Path |
| Local Path | Local Path |
For Amazon S3 you can leave Endpoint URL blank: the wizard then uses https://s3.<region>.amazonaws.com for the region you enter.
The server validates the target when you complete setup. If it rejects the configuration (for example a local path inside the container's own filesystem), setup still completes, and the last step shows Your storage destination was NOT saved with the reasons. Add the target afterwards under Settings → Storage Targets. Until a target exists, runs end as partial with "no enabled storage targets, nothing was uploaded".
Step 4: Backup schedule
The wizard creates three jobs. Each schedule is a cron expression, edited with a picker that shows the upcoming run times. Times are in the container's time zone (TZ).
| Job | Type | Default schedule | What it refreshes before uploading |
|---|---|---|---|
| Full Backup | full |
0 7 * * * (daily 07:00) |
Database dumps and the flash archive |
| DB Dumps | db_dump |
0 6,18 * * * (06:00 and 18:00) |
Database dumps only |
| Flash Backup | flash |
0 5 * * * (daily 05:00) |
The Unraid flash archive only |
Every job then uploads a complete snapshot: the dump folder plus all enabled watched directories.
Which targets each job uploads to:
- Full Backup uploads to the target created in step 3.
- DB Dumps and Flash Backup have no targets of their own, so they upload to every enabled target, including ones you add later.
The defaults are staggered so the jobs don't overlap. If a scheduled job fires while another backup or a restore is running, it waits for it to finish. If it is still blocked after 3 hours, the run is recorded as skipped. A manual run started while another backup is running is refused with "Another backup is already running".
You can change schedules later under Settings → Schedule, and pause or add jobs under Settings → Backup Jobs.
Step 5: Directories to watch
These folders go into every snapshot, next to the database dumps. On Unraid, the wizard preselects /mnt/user/appdata when it can see it, so the configuration of every app is covered.
Add more folders by typing an absolute path, such as /mnt/user/documents, and clicking Add. The path must be visible inside the container, so map it in the container settings first (see Quick start). The wizard doesn't check that the path exists. A path that is missing at backup time makes every run partial with "backup path(s) not found".
You can add, remove and scan for folders later under Settings → Directories. There Arkive suggests folders worth backing up, skips large media folders, and checks that each path exists.
Click Complete Setup. Arkive saves the password, the target, the directories and the jobs, and starts the schedules.
Step 6: Done
The last step shows your API key, which is not shown again. Copy it into your password manager:
- The web interface uses it once per browser to create a session (an
HttpOnlycookie valid for 30 days). The wizard signs this browser in for you. - Scripts and the CLI send it in the
X-API-Keyheader. - A copy is written to
/config/.api_key, readable only by its owner.
You can rotate the key under Settings → Security. Rotating invalidates the old key, signs out every other browser, and updates /config/.api_key.
Go to Dashboard finishes the wizard. The dashboard then shows the Finish protecting this server checklist: run the first backup, prove a restore works, add an offsite target and a notification channel, and save the recovery kit. Finish protecting this server explains each step, and Quick start has the short version.